
Gain staging is hitting the right levels at the right time.
In other words, your audio signal shouldn’t be too ‘hot’, or too low a level for a particular piece of gear or processing the signal is going through. There are a few places you need to worry about gain. But getting the first one right will take care of 90% of your gain staging issues.
Signal Flow In Modern DAWs
In a modern DAW recording setup, the audio signal typically takes this (simplified) route (with the exception of MIDI instruments).
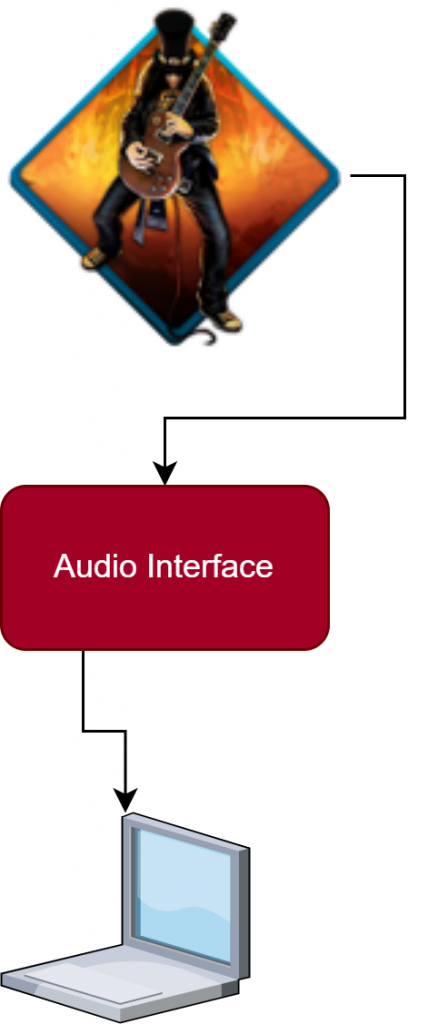
1) You plug a mic, or an electric guitar (or some musical instrument) into your audio interface.
2) You sing a note, or strum the guitar and a microphone, or a pickup transforms that into an electrical audio signal, which hits your audio interface.
3) You set the level on your audio interface so that it doesn’t overload (clip, distort) at the audio interface, but is solidly lighting green, or showing good levels on your meter.
4) Your audio interface converts the analog, electrical signal into digital ones and zeros. If you route it to a track on your DAW, you can record it.
5) Have a sarsaparilla, you’re a flippin’ audio engineer!
Now here’s where you might hear different pieces of advice. Some folks will advise you to put a meter on your channel and shoot for -18dBFS when you’re recording, or some other specific level. This is not bad advice, but don’t get rigid about it.
What Levels Should I Shoot For?
If you are in a bedroom producer, home-recording situation, here’s what I’d suggest. Get a meter and shoot for -18dBFS, when you record. Audio levels vary, so make sure you’re not peaking your audio interface at any point in the track.
Plug-ins Vary in their level ‘sweet spot‘. So don’t get hung up on it.
Now, unless it’s a test tone, or a pure sine wave, a signal is not going to stay exactly at -18dBFS. It’s going to peak above that, and be completely gone when the instrument is not playing. My advice is to set the input gain so the signal hits around -18dBFS most of the time, and never goes above -12dBFS.
Some instruments are going to be very smooth, and it will be easy to do this. Some instruments may vary more with dynamic range, and you might have to drop it down a bit from where you’d like. That’s OK.
In some cases, if dynamic range is too great, you might want to divide performances into two different takes. For instance, if you’re recording death metal and the singer is whispering “I’m a tough guy” during the verses, and screaming “Mommy, help me” during the choruses, you might not get a good level that covers both sections. Set the level for verses and record verses. Then reset the input level for the choruses, and record those.
-----------------
There are some audio interfaces with preamps that sound sweet when you drive them a little bit hard. One of the reasons people buy tube preamps, for instance, is that tubes add some nice harmonics to the sound when you overdrive them.

So, if you have an interface that sounds good this way, you might have to hit it a little bit hot.
Other preamps might have a sweet spot at which they have less noise, or sound best. This can vary from microphone to microphone, too. You'll just have to learn about your specific preamp/mic combo.
-----------------
Other than that, don’t worry about gain staging (with a couple of caveats).
Consistency With Levels Helps Keep Your Session Organized & Tight
If you don’t overload at the interface, you’re unlikely to clip the recording level (unless you’ve got something weird going on). So, you can change the gain of the clip afterwards, if you really need to, as long as your level coming in is in the ballpark.
However, it’s better to be relatively consistent and good with your levels, as it will make later stages such as adding processing and mixing, easier. For instance, it’s easy to record too hot and when all your tracks add up at the master, you have to pull everything down.
It’s not a disaster. It’s just better from a work flow and organizational standpoint to have things taken care of already, when levels hit the master fader.
Loudness and quietness vs levels: I use different terms when I talk about the strength or weakness of recorded signals as opposed to the strength or weakness of sound in the air.
You can have a very strong signal recorded, so the signal would be ‘hot’, or ‘at a high level’. However, how loud it is will depend on how much your speakers or headphones are turned up.
So, I’ll usually use ‘high level’ or ‘hot’, for a recorded signal, and ‘loud’, or ‘quiet’ when referring to how loud a sound is in the air.
Loudness is not the same a level
Good Gain Staging Keeps Your Signal/Noise Ratio In Check
Instruments, environments, audio interfaces, and plug-ins sometimes have a little noise. We want out musical sounds to be louder than the noise, right? The hotter signal we cram into any device or piece of software, the stronger the signal (music) is to the noise (hiss, ground hums, traffic noise).
The other side of the coin is that too strong a signal level, and we might clip (distort) some piece of gear or software, in an unpleasant way. So, we want a good strong signal compared to the noise, and a lower level than peaking. -18dBFS to -12dBFS, is a good guideline for that. Capiche?
Gain For Plug-Ins
Now, I don’t generally record with any effects or processing ‘to tape’. And I recommend you do the same in most situations. But after the signal is recorded, you might want to EQ it, or compress the signal. Or you might want to put a guitar amp simulator on a dry, direct guitar track.

Typically, these kinds of things are done on the track after the recorded signal, but before the channel fader. In other words, the signal flows from the recorded file, to the amp sim, EQ, or compressor, and then to the channel fader.
So, the level of your track will affect how hard the signal hits the effect, but the fader comes after. Some processors are modeled on analog gear which may like to see a certain level at the input. If your recorded level is too low, and your processor doesn’t have an input gain, you might have to increase the gain of your recorded track. If the track level is too hot for the plugin, you might have to decrease the input level on the plug-in, or (if it doesn’t have an input level control) insert a gain/trim plug-in before the processor.
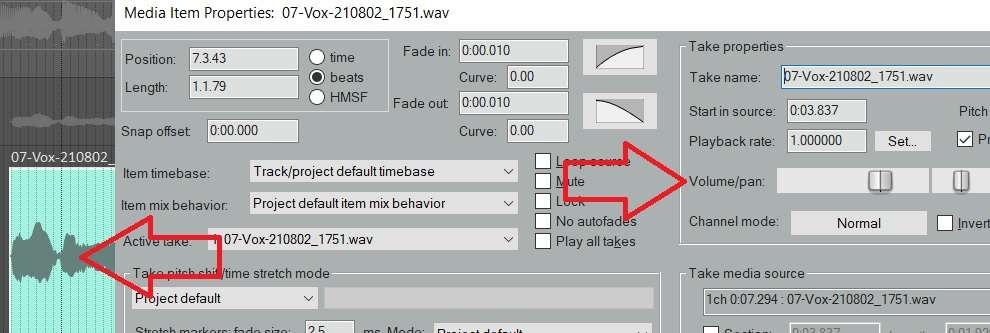
Another option to control gain after recording, is to simply bring it up or down with the DAW software. Every DAW has a way to change gain on a recorded file. In Reaper, you can right-click a clip, select “Item Properties” and adjust the volume control.
But many processers have input levels you can use that will work just fine. Again, they often have metering built in, and green is good, red bad 🙂
Level Matching Input & Output Levels With Processors
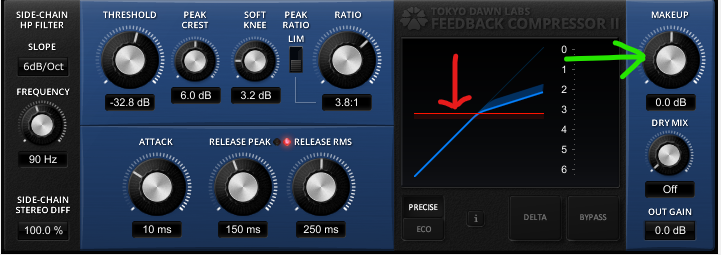
The processing can affect the level of signal to your channel fader, as well. So here’s a piece # 2 of gain staging advice. In general, you want to track to be about as loud coming out of a processor, as it was going in.
So, if you compress a signal, and it sounds quieter afterwards, use the output of the compressor to make up the gain. Turn the plug-in on and off and make the levels match. If you EQ a signal and add significant gain at certain frequencies, you might want to turn the output of the EQ down a touch, but if there’s no output level control, it’s not a sin to turn the channel fader down.
Here’s the world we’re shooting for.
- You get a good, consistent level at your audio interface and each track gets a good level signal recorded.
- When you process tracks, you adjust the output gain in the processors so the channel is about the same loudness before and after.
- When you get ready to mix, everything is decently balanced already. You don’t have to get wild.
The Role Of Buses
I typically run all my guitar tracks to a guitar bus, all my drum tracks to a drum buss, and all vocals to a vocal bus. Then all this gets summed at a pseudo-master I create, which sends to the master.
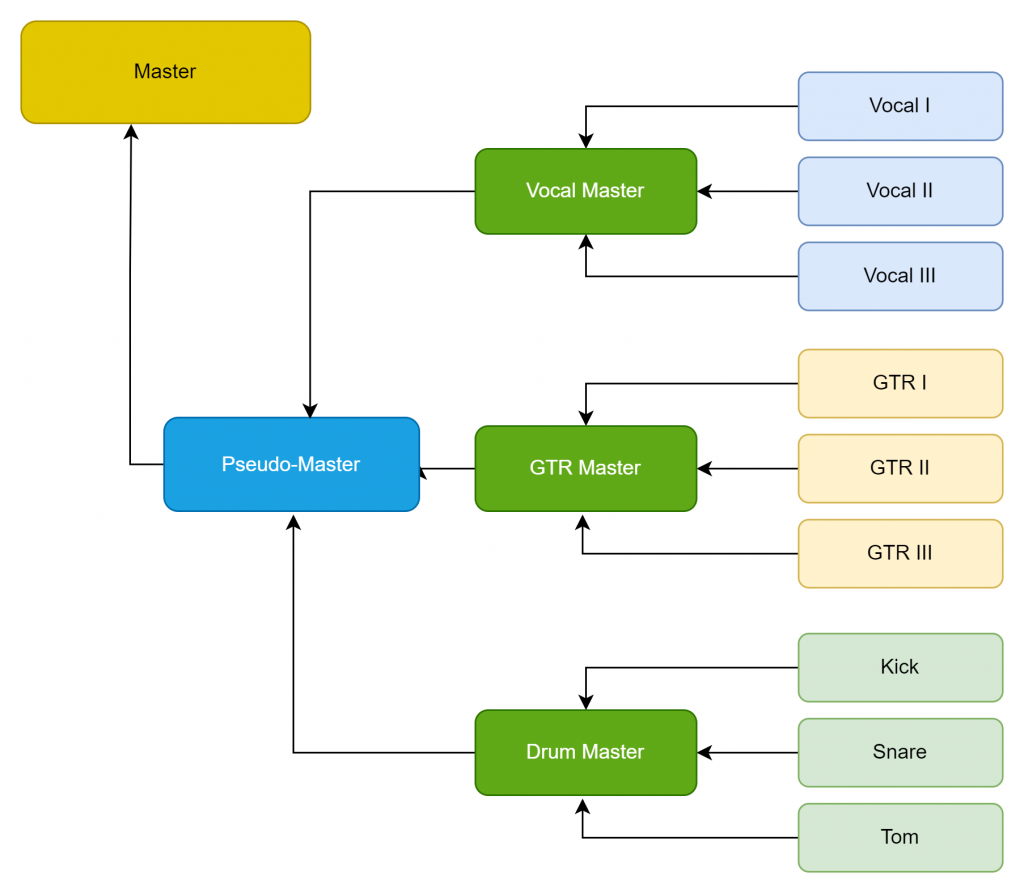
This makes it really easy to mix. It also gives me a lot of control over gain at various stages.
If the guitars are too loud overall, I turn down the guitar master. If only one guitar is too loud, I go to that specific track and turn it down. Vocals too quiet compared to guitars? I have the vocal bus I can use to give it a little boost.
What if the whole mix is too hot? I can just turn down my bus masters a few dB. Or, I can turn down a pseudo-master I’ve got happening. I’ll come back to that, later.
What if my guitars are overloading the guitar bus? I select all the guitar faders and turn them down simultaneously.
This gives me control of everything from the biggest, broadest possible changes, to granular changes. It’s easy and organized.
The last place you need to think about gain is at the master fader. If you’re sending your mix off to a mastering engineer, they may tell you to hit a specific target as far as how hot they want the mix to be (although they can change the gain easily, on their end). If you’re mastering yourself, you do need to hit certain parameters on the way out.
Levels, When The Music Leaves The DAW
If you’re mastering a song yourself, you will render to a format such as 44.1kHz, 16 bit (for CD). This format is not forgiving of signals above 0dB.
However, if you render out a piece of music that’s too quiet, it won’t sound good compared to other CDs. So, we want to get the level up there, near 0dB in the loudest parts, but not go over.
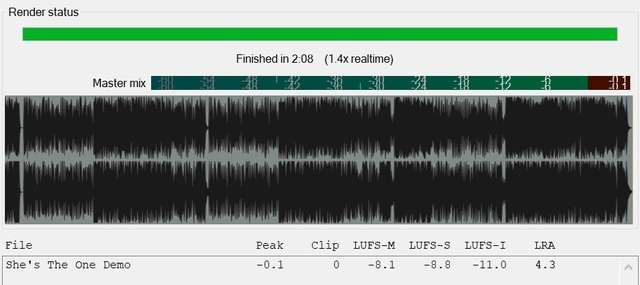
This is usually achieved through judicious use of compression (a processor that narrows dynamic range) at various places (individual instruments, buses, and the whole mix), and limiting as the final stage.
A limiter is a form of compressor that limits the signal from going above a certain level. Basically, no matter how hard you drive a signal into it, it won’t output a signal higher than the threshold you set.
Limit too much, and the mix may sound flat. Not every song requires limiting, but in general, limit too little, and your mix may be quieter than other, similar songs. It varies some by genre, but the principle holds.
So, this is the last place to gain stage. In other words, how hard you hit the limiter with your mix can be important. But frankly, it’s pretty easy to deal with a wide range of levels coming into a limiter.
Why? Because limiters will have an input level control, or a threshold, and an output level control. You just set the input or threshold to get the desired amount of limiting, and set the output to be -1dB or so (so that you don’t go past 0dBFS).
If you need to gain stage dramatically at this point, you’ve got something out of whack earlier in your audio chain. But, if you have a pseudo-master, you can tweak things a little bit.
Simply put the limiter as the last thing on your master fader. One reason I use a pseudo-master (one last volume control before the master fader), is to deal with level issues at the final stage. If my levels are a little low, or high coming into the master, I can deal with it there. I usually use a limiter as the last thing in the effects chain to get the overall level and loudness levels right where I want them.
Gain Staging For MIDI and Virtual Instruments
MIDI and virtual instruments are a bit different. MIDI is information about music, but the sound is produced later, by a synthesizer/virtual instrument. The sound can be generated a plug-in, or an actual synth connected to your DAW via a MIDI or USB cable.
In this case, the gain is determined by the level coming out of your synthesizer, or virtual instrument. These tend to be a little hot, so you can turn the output of the instrument down on the instrument, or GUI interface, and pull your channel faders up to about the same level as your other faders.
If your virtual instrument doesn’t have a volume, you can insert a gain or trim plug-in. Or, you can just not worry about it, and keep your fader low.
When To Ignore This Gain Staging Advice
In the video, I shoot for -18dBFS to -12dBFS coming into my tracks, and then my amp SIMs. In order to hit this level, I roll off the volume on my guitar, and turn the audio interface’s input gain all the way down. However, both amp SIMs (and sometimes other plug-ins) seem to want to see a higher level input than -18. I end up boosting the gain going into the plug-ins.
In retrospect, I think it would be better to turn the guitar up a bit, hit the audio interface a little harder, and record the signal at (gasp!) hotter than -18 to -12. How would I do this?
I’d turn up the guitar until the audio interface peaks, and then back off the guitar volume a bit. Why would I do this? Well, in general, boosting signal earlier is better than boosting signal later.
Why is that?
Think of it this way. Let’s suppose the guitar cable adds a touch of noise. If the guitar volume is higher, the signal/noise ratio improves. If the guitar level is lower, and I turn it up later in the signal flow, the noise come up too.
Just a reminder . . .
Shooting for -18dBFS is a guideline, and not a rule. You won’t get in trouble with your mom if you don’t hit it exactly. In fact, when recording a guitar I know will go through one of the amp SIMs I showed you, I’d probably go for -9 to – 3, or so.
Your Mom
Gain Staging In A Nutshell
- Get your input levels right, preferably with metering on your audio interface. -18dBFS is a reasonable target. Don’t clip here!
- When adding processing on individual channels, make the level about the same coming out of the processor, as it was going in.
- Use buses, including a pseudo-master
- If you’re mastering yourself, use a limiter as your final processor.
- Basically, if you get your input levels correct, you’ll be most of the way there.
How We Used To Set Audio Levels
This next section is a little background, if you’d like to go more into depth about where all this came from.
Back in the day, when I, and many of the people teaching audio learned, we talked a lot about signal-to-noise ration, and headroom. In short, electronic components and magnetic tape could only take so much level before they start to sound ugly (unwanted distortion). However, you were trying to get the signal louder that the inherent noise in the system.
This article goes into detail more about the differences between gain staging in the analog and digital worlds.
Nick Messitte / Izotope
Tape, as one example, has a little bit of hiss to it when you’re playing back. If you have a low level of signal on tape, you have to turn up your speakers to hear it and you turn up the hiss, too.
So, we were shooting for levels that were up above the noise, but below the level of unwanted distortion. In general, the hotter a signal you could ‘print’ to tape, without distortion, the better your signal-to-noise ratio was. In other words, a hot signal means less hiss.
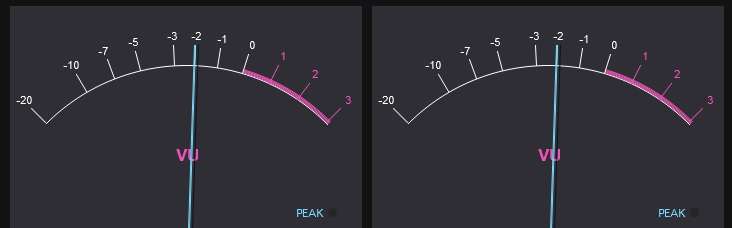
VU vs Peak Metering
I used mostly VU meters in those days. VU meters react a bit like the human ear. They don’t respond to fast signals (transients) very well. We engineers and producers got very adept at knowing how to read a VU meter on a voice, compared to a snare drum.
And we learned how hard we could drive a signal to tape to get a little bit of that warm, nice, analog distortion. But not too much! Setting levels became second-nature.
Often the consoles had some kind of peak metering, too, which track transients more accurately. Most typically, there’s a light somewhere in the input section of the desk, that goes red when you are hitting it too hard.
Setting Levels in Live Sound
I used to run live sound at a club that would have 3 bands a night, and 15 minutes in between bands. Here was the process.
1) Turn the channel faders down on the console.
2) Get band # 1 off stage, and band #2 on stage.
3) Slap mics on everything that needed a mic, and DIs on every thing that needed a DI.
4) Starting with the drummer, have he or she hit every drum a few times. On the console, turn up the input gain until you hit a good level, either on a meter, or via a light.
5) Only then, bring up the fader, do a quick EQ, and move on.
6) Repeat the process for every channel.
At this point you will have a rough mix going and the channel faders will all be about the same level. In other words, you won’t have one fader at +12, and another at -45. During the first couple of songs, I would fix any gain issues with the input gain.
In other words, if I had to turn a fader too far down because the instrument was too loud, I would probably use the input gain. Conversely, if something was way too quiet, I’d probably misjudged the input gain level, and I’d turn that up.
After that, you can mix with the faders.
That was simply making sure the mics and DIs were hitting the channels at a good level, and therefore the faders would be in a good spot. Gain staging.
Essentially, I used the same process in the recording studio. Make sure channel faders are down, plug mics in and route them to tracks, turn up the mic pre-amps until they look good on whatever metering I have, then turn up the faders and dial in a sound.
Gain Staging Round-Up
Honestly, I was really surprised to see gain-staging was such a hot topic in audio forums. I have seen loads of advice on what to do. A lot of it involves metering and shooting for certain targets on the meter. Even though that’s what I suggest you do to start, I don’t think that way.
While I’m playing or singing, I simply turn up the gain on my audio interface until I see green, or a good level on my meter. Then I go to the loudest part of the song and play/sing, to make sure I’m not in unwanted distortion land. Then I do a take of a short section. You know how I check my levels? I look at the waveform!
After you’ve been setting levels for a couple of days by a meter, you’ll know what a good level looks like on your recording software.
I guarantee you’ll get into trouble somewhere along the line. You’ll put a processor on a channel, and your signal will be hitting the input way too hard, or way too soft. You’ll have a fader way up, or way down somewhere.
Start from the beginning, and think it through. Look at the waveform on the recorded track. If it’s not good, use clip gain, or a trim/gain plug-in as the first thing in your processing chain. If the recorded file is OK, go through whatever you’ve got on the track, one-by-one.
Lookie there! You’ve got a compressor taking 18dB off the top of the signal. No wonder it’s so low coming into the EQ! And that’s the way we roll.
Keith
Resources
Voxengo Span: Voxengo Span is a free, useful frequency analyzer which includes a peak meter. Windows & Mac.
Rea (Reaper) Plugins: ReaEQ, ReaComp, ReaXcomp, ReaDelay, ReaFIR and others come with Reaper. If you don’t have Reaper, you can download the VST versions of ReaEQ, and these other useful plugins here. If you want to follow along with my tutorials, it will be good to have these. VST/VST3 versions available for separate download (Windows & Mac).
TT Dynamic Range Meter: Gives you an easy-to-read indication of the dynamic range of your material. 32 bit only.
Melda MFreeFX Bundle: Includes MLoudnessAnalyzer (it has a peak meter) and 36 other free effects, analyzers and tools. (Windows & Mac versions available)